Standard Teaching Spaces
These classrooms are equipped with standard technology, including conference cameras and room microphones, all connected via a USB hub.
Rooms with this technology
- Baker 140A
- Baker 140B
- Baker 154A
- Baker 235A
- Baker 235B
- Baker 237B
- Baker 255A
- College of Fine Arts 102
- College of Fine Arts 317
- College of Fine Arts 318
- Cyert Hall 100A
- Doherty Hall 1112
- Doherty Hall 1117
- Doherty Hall 1209
- Doherty Hall 2105
- Doherty Hall 2122
- Gates 4101
- Gates 4102
- Gates 4211
- Gates 4215
- Gates 4301
- Gates 5222
- Hall of Arts 107
- Mellon Institute 348
- Mellon Institute 355
- Mellon Institute 448
- Porter Hall 125B
- Porter Hall 125C
- Porter Hall 125D
- Porter Hall 126A
- Porter Hall 226A
- Porter Hall 225B
- Porter Hall 226B
- Porter Hall 226C
- Posner Hall 145
- Posner Hall 146
- Posner Hall 151
- Posner Hall 152
- Posner Hall 153
- Wean 4625
- Wean 4707
- Wean 4709
- Wean 5201
- Wean 5202
- Wean 5302
- Wean 5304
- Wean 5316
- Wean 5310
- Wean 5312
- Wean 5320
- Wean 5328
- Wean 5403
- Wean 5409
- Wean 5415
- Wean 5421
- Wean 6403
- Wean 6423
- Wean 8427
Get Started
1. Connect
Do one of the following:
- Log in to the Desktop Computer (recommended if available).
- Tap Desktop on the Panel.
- Log in with your Andrew credentials.
- Connect your laptop and share your screen with the room.
- Connect the HDMI or USB-C cable to your laptop and tap Laptop on the panel.
- Connect the USB cable to your laptop to use the conference camera and microphone.
Note: If your device does not have an HDMI or USB port, please bring your own multi-port adapter.
2. Connect to Zoom for remote participants.
If you have remote participants, start the Zoom meeting for them.
- Open the Zoom app and start the meeting.
- Select your profile icon > Settings.
- Verify the Video and Audio settings:
- Video - Huddly GO
- Audio (Microphone) - Yamaha YVC-200
- Use the Zoom app to share your screen and adjust your camera.
I'm set up, I want to...
Preview a device on the monitor
- Under Actions, select Video Preview.
- Tap Desktop to preview on the monitor.
- Tap Left Display or Right Display to preview additional devices (if applicable).
- Tap the arrow to return to the touch panel menu.
Please note that this may not be available in all rooms.
Share my screen with remote participants
- Click Share Screen from within the Zoom meeting.
- Select either your desktop or an application and then click Share. The toolbar will move to the top of the screen.
Share the document camera
- Place the materials under the document camera.
- Place the materials under the document camera.
- Tap Laptop. The document camera will be projected in the classroom.
- Click Share Screen from within the Zoom meeting.
- Select Advanced and then Content from 2nd camera.
- Select ELMO UVC Camera as the USB document camera and then Share.
Note: Not all spaces are equipped with a USB-enabled document camera.
Share annotations using an iPad on Zoom
Before you begin, make sure:
- Your iOS device (iPad or iPhone) has the latest version of Zoom installed and configured
- Your laptop and iOS device are on the same network (CMU-SECURE is the preferred).
Follow the steps below to share:
- Click Share Screen from within the Zoom meeting on your laptop.
- Select iPhone/iPad and then click Share.
- Follow the onscreen instructions to connect your iOS device.
You can also use annotation tools on a shared screen or whiteboard within the Zoom meeting.
Record the class/meeting
- From your Zoom meeting, click Record. Remote participants will be notified that the meeting is being recorded.
- Do one of the following:
- Select Record on this computer to save the recording to your hard drive.
- Click Record to the cloud. You will receive an email with a link to the recording once it's available for viewing.
- Learn more about Meeting Controls and Tools.
Technology Overview
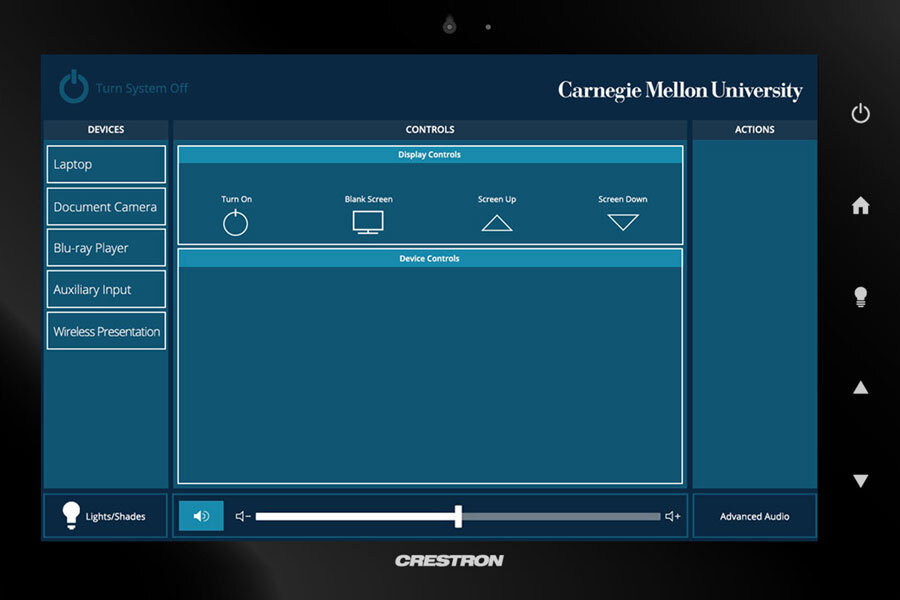
Touch Screen
The existing touch screen and room projectors control what is presented in the classroom.
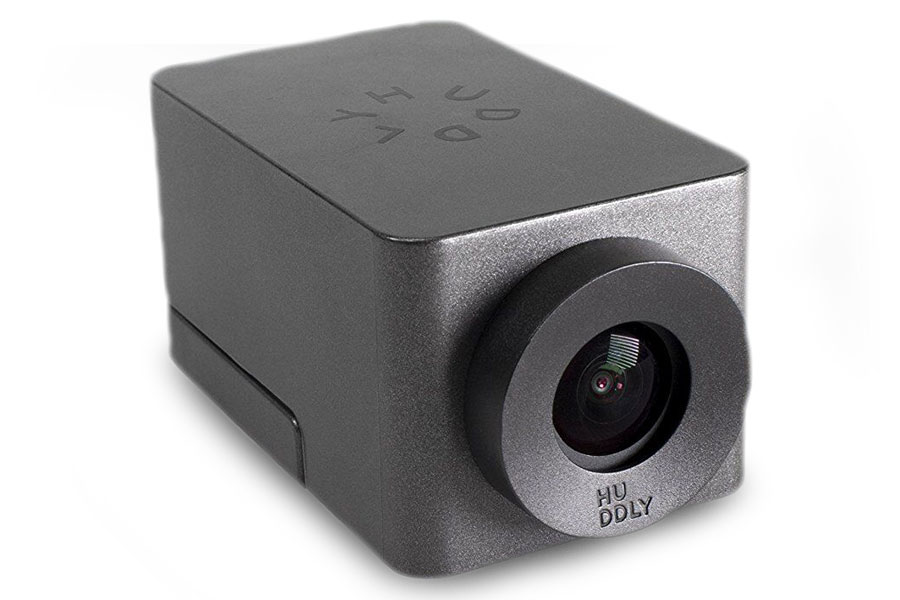
Conference Camera
The Huddly GO is a compact, wide-angle conference camera used to provide a view of the instructor's area (up to 150 degree wide angle). The camera can be manually adjusted (as needed) to capture different areas of the classroom.
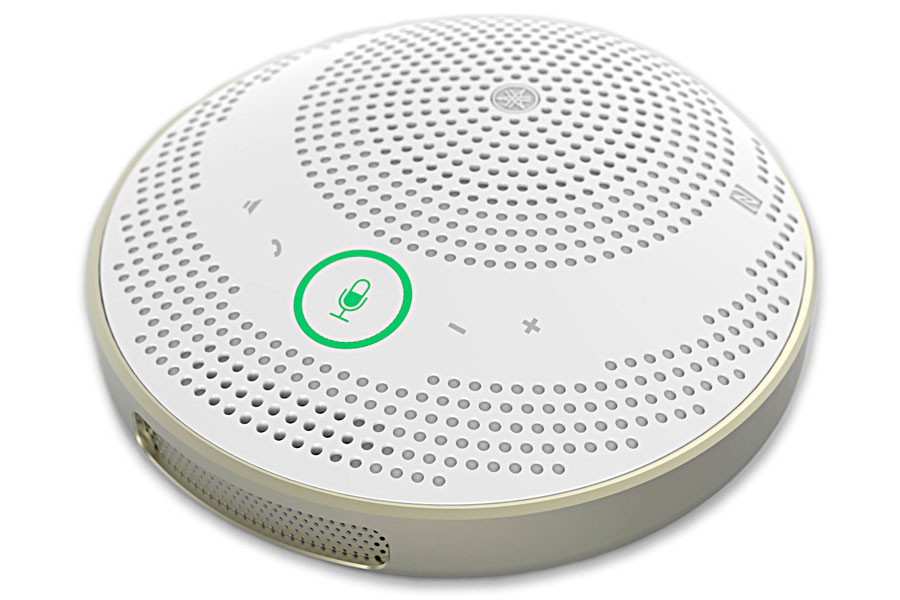
Room Microphone
The Yamaha YVC-200 microphone is designed to capture and enhance the instructor’s voice (up to a 2-meter/6.5-foot radius) for remote participants. Volume control can be managed through the Zoom app or using the volume buttons (+/-) on the microphone.
Zoom
Zoom is CMU's preferred web conferencing solution designed for remote learning support. Visit Zoom for more tips and help.