How To Use MassMail
A MassMail message requires two files:
- A completed Merge File that contains the email addresses of those you'd like to send your message to. Note: The merge file also contains additional fields for customizing your message.
-
The message you'd like to send to your Merge File list to.
To create these files, and use them with the MassMail service, follow the instructions below.
Create a MassMail Merge File
To create a MassMail merge file, do the following.
- Gather all your information, including the complete email addresses of the recipients of your message.
(optional) If you are sending a personalized MassMail message, gather merge field data for each email address. See Merge File Fields for important details. - Download the MassMail Merge File (csv), then open it. Note: You can rename the file, if you want.
- Enter the email addresses you want to send your message to, beginning in cell 2A (the cell below the field %EMAILADDRESS%). Click the cell, then enter the complete email addresses into column A, one address in each cell. Enter data only in the cells below row 1.
Note: A valid MassMail merge file must have a minimum of three complete email addresses in column A, one address each in rows 2, 3 and 4. Do not leave an empty cell between email addresses.
Example of a Merge File
- (optional) For a personalized MassMail message, click the cell in row 2 in each column, then enter the data for each merge file field in the appropriate cells. Confirm that the correct data corresponds to each email address.
Example of a Personalized Merge File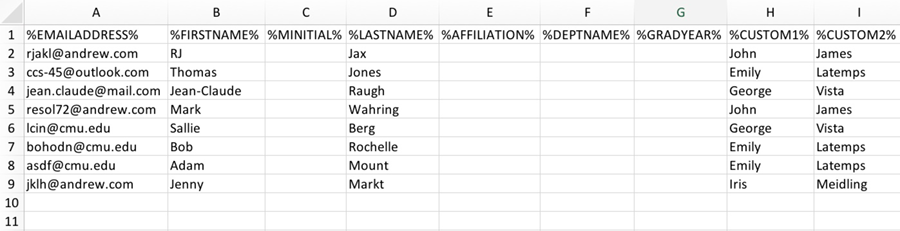
- Save your document in .csv format.
Merge File Fields
- Row 1 of the template contains the names of the MassMail merge file fields in a fixed order.
Important! Do not change the names or locations of the fields. Do not change the order of columns A through L in the template. - A merge file field must be formatted as follows: all uppercase letters, and beginning and ending with the percent (%) symbol, for example, %DEPARTMENT%.
- In a personalized message, the name of each merge file field must be identical to the name of the corresponding field in your .csv file.
Adding @andrew to Your Andrew UserID List
Lists exported from Grouper contain only Andrew userID, First and Last Name. Follow the steps below to add @andrew to your list for use with Massmail.
Get Your List From Grouper
- Log into Grouper.
- Locate your group.
- Select More Actions > Export Members.
- Choose the data you want to export only member IDs or all member data.
Add @andrew
In the example below, the export includes only member IDs.
- Open the .csv file in Excel.
- Insert a row for your headers (i.e., email address).
- Click the column B heading to select the entire column and change the cell formatting to text (Format > Cells).
- Type @andrew.cmu.edu and autofill to the end of your list.
Note: To autofill, hover over the right corner of the cell until you see a +, then drag down. - Click the first cell in column C and enter the formula =A2&""&B2.
- Autofill the formula to the end of your list.
- Click the column C heading to select the entire column.
- Click the first cell below your headers and paste without formatting (Edit > Paste Special > Values).
- Delete columns A-C. Column D should contain your list of Andrew email addresses.
- Add headers for the Massmail tool and Save.
Send a MassMail Message
To send a general MassMail message, do the following.
- Log in to the MassMail Service.
- Click Send New MassMail.
- Fill in the following fields:
From Email address of the sender Specify mergefile Click Choose File to select the file containing the list of email addresses where the message will be sent. See Create a Mail Merge File for details. Subject Subject of the message Reply To Email address where a recipient sends a reply Bounce Address Email address where you want to receive messages that cannot be delivered Type message below The text you want to send, which can be a fixed message, or a personalized message with custom fields. See Create a Mail Merge File for details.
Example of a Fixed Message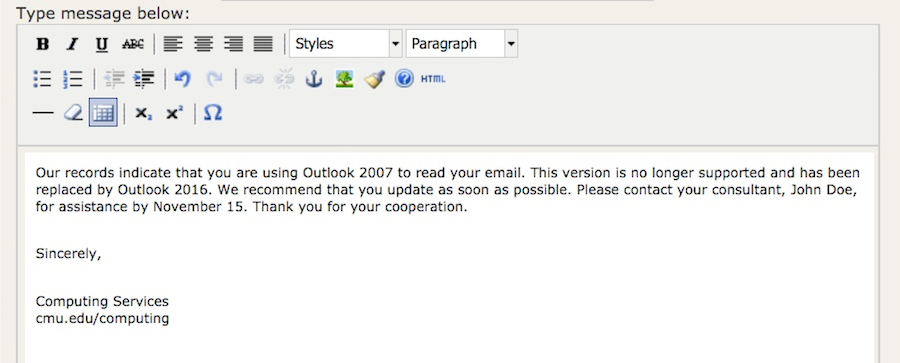
Example of a Personalized Message with Custom Fields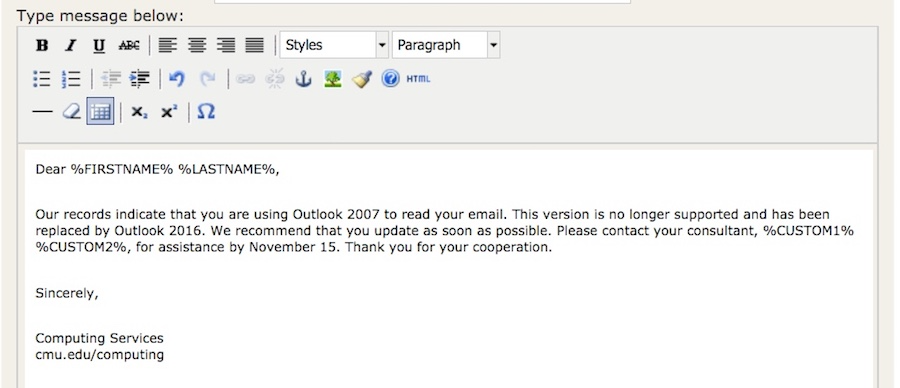
- (optional) To delete all information on the form, click Reset Form.
- Click Preview to view your message as it will appear when sent.
- Click Send, then OK to send your message or Cancel to cancel the message.
Note: To view messages sent by Massmail, click Manage Past Massmails. These do not show in your Sent email.
Manage Past MassMail Messages
To manage past MassMail messages, do the following.
- Log in to the MassMail Service.
- Click Manage Past MassMails.
- Do one or more of the following:
-
- Preview a message - Click Preview next to a message.
- Edit a message - Click Edit next to a message.
- Delete a message - Click the box next to a message in the SELECT column, click Delete Selected (bottom-left), then click OK.
-