Use the Electronic Whiteboard
The Electronic Whiteboard can be used to scan your notes and save them to a USB device or SD card. Below are steps for using the whiteboard.
Parts of the Whiteboard
Before you begin, it’s helpful to become familiar with the buttons, ports and switches on the electronic whiteboard.
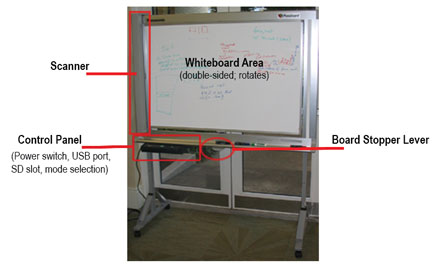
Control Panel
The following identify the buttons, ports and switches on the Control Panel.
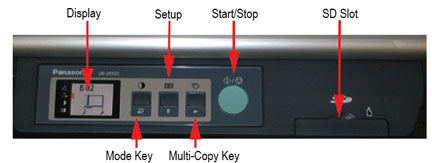
Display and Mode Key
The display area of the Control Panel shows the current time, scan status and output destination (e.g., USB or SD). The selected mode (i.e., scan quality, color or b/w) is indicated along the left side of the display area.

Mode Key
Press the Mode Key to scroll between the following options. An indicator appears on the display next to the selected mode.
![]() Color-Fine: high resolution color; best for color documents
Color-Fine: high resolution color; best for color documents
![]() Color Standard: normal resolution color; best for hand written text or diagrams in color
Color Standard: normal resolution color; best for hand written text or diagrams in color
![]() B/W-Dark: scan black and white images to be darker than normal
B/W-Dark: scan black and white images to be darker than normal
![]() B/W-Normal: normal density for black and white images
B/W-Normal: normal density for black and white images
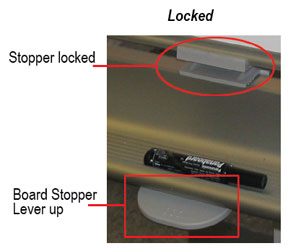
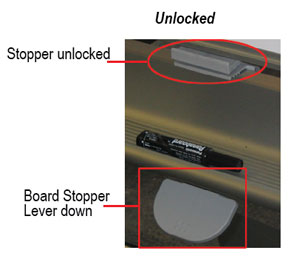
Rotate the Whiteboard
The Electronic Whiteboard can be rotated to utilize both sides of the board.
- Verify that the scanner is to the far left side of the whiteboard.
- Push the Board Stopper Lever down to unlock the whiteboard (see images below).
- Be sure that you have enough clearance and then rotate the whiteboard.
- Return the Board Stopper Lever to the locked position (up).
Store Scanned Images on a USB Device or SD Card
Use these steps to scan your whiteboard notes and store them to a USB flash device or SD card.
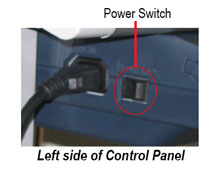
- Set the Power Switch to the On ( | ) position (left side).
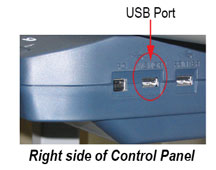
- Connect the USB flash device or insert the SD card.
Note: The USB Flash Device port is labeled Memory and is located on the right-side of the Control Panel. The SD card slot is at the front of the Control Panel. - A USB or SD icon will blink on the display while the device is loading. When it is ready, the icon will go to a steady display.
- Press the Mode Key to select the scan mode (e.g., Color-Fine/Normal, B/W-Fine/normal).
- Press the Start/Stop;Key. The unit will begin scanning and display the scan status in the display area of the Control Panel. When the scan is complete, the scanned image is displayed on the Control Panel.
DO NOT remove the USB flash device until the scanned image displays on the Control Panel.
Important:
- If you press the Start/Stop key and a USB flash device or SD card is not connected to the whiteboard, the scan will not start.
- If the scanner does not respond, the USB device or SD card you are using may not be supported.
- If your SD card was previously formatted, it may not be recognized by this unit. Please reformat the SD card.
File Name and Format
File Name
When you scan an image to a USB flash device or SD card, the image is automatically stored on the device. Scanned images are saved as follows:
- Folder: UB-2315C
- File Name: MMDDHHxx (month-day-hour-sequence number)
File Format
Scanned images can be saved in PDF or JPEG/TIFF format. Use the Set-up key to change the file format for stored images.
- Press the Setup Key.
- Press the Setup Key again to access the file format options.
- Press the Multi-Copy Key to toggle between PDF and JPEG/TIFF.
Note: When JPEG/TIFF is selected, color images are stored as JPEG and black and white images as TIFF. - Press the Mode Key to return to standby mode.