Install CrowdStrike
Follow the instructions that correspond with your operating system to install. This software is pushed automatically to Desktop Support Customers (DSP).
macOS 13 (Ventura) and Newer
Complete all the steps below to complete the installation process on Apple computers running macOS 13 (Ventura) or newer.
Begin Installation
- Uninstall ESET Endpoint Security from your computer, if applicable.
- Download Falcon Sensor for Mac.
- Double-click the downloaded file.
- Click Continue, then follow the prompts to complete the installation.
- Enter the username and password you use to log on to your machine, then click Install Software.
- If prompted, click OK to allow the Installer.app to continue.
- Click Continue.
- When prompted, enter your Customer ID with Checksum and leave the optional Installer Token blank.
Note: If your departmental technology support has given you a Customer ID with Checksum, enter it here. Otherwise, use the Token in your Order Details. Navigate to Your Account/Orders within the OnTheHub software portal to locate it. - Click Continue.
Enable the Network Filter
- The CrowdStrike Falcon Network Filter must be enabled during installation. When prompted, click Setup to continue.
- Click Allow to grant Falcon access to filter network content.
- When the status checkbox turns green, click Continue.
Load the System Extension
- Click Setup to load the system extention.
- Click Open System Settings and then click the slider to enable the extension.
- Enter the username and password you use to log on to your machine, then click OK, and then Done.
- When the status checkbox turns green indicating Crowdstrike loaded the extension, click Continue.
Grant Full Disk Access
- Click System Settings when asked to grant full disk access.
- Click the slider to enable full disk access.
- Enter the username and password you use to log on to your machine, and click Modify Settings.
- Close the System Settings window and return to the CrowdStrike Falcon Sensor Setup window. When the status checkbox turns green indicating you have granted full disk access, click Continue.
Grant Access to Bluetooth
Falcon Sensor requires access to Bluetooth to function. Even if you see a green check during setup, you must grant access manually.
- Click System Settings when prompted to open the Bluetooth system settings.
- Click + and enter your username and password.
- Navigate to the Applications folder, select Falcon application, and click Open to grant Falcon access to Bluetooth.
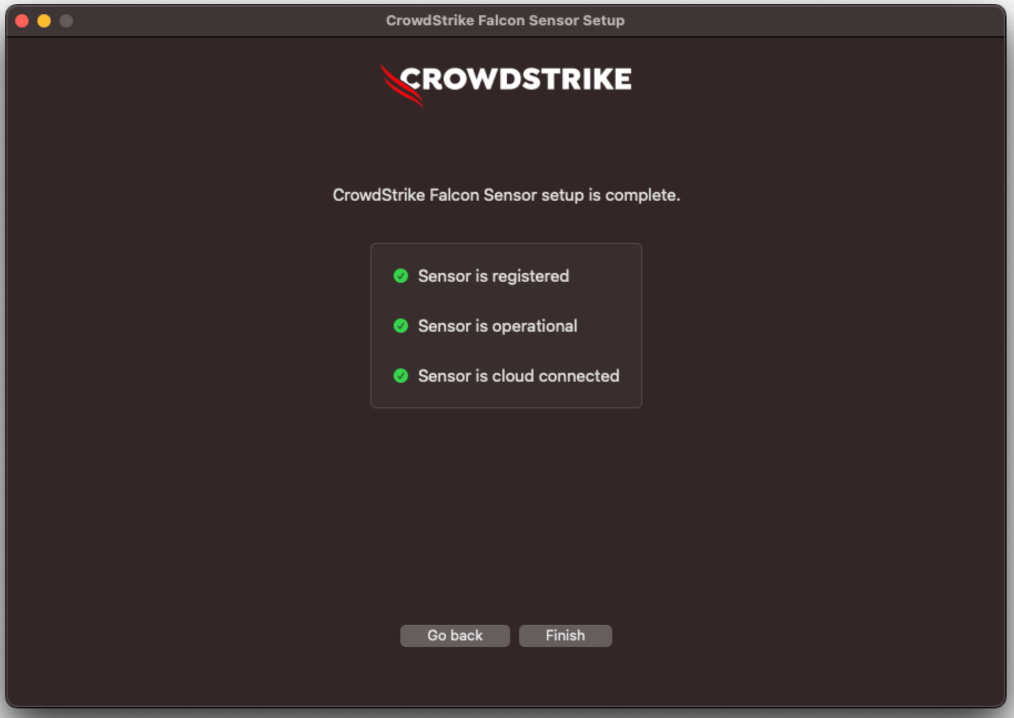
Complete Installation
- Click Quit to Reopen if prompted.
- When Falcon reopens, ensure you see three green checkmarks, indicating the sensor is operational and correctly configured.
- Click Close to complete installation.
macOS 12 (Monterey) and Older
Crowdstrike Falcon supports Apple's current operating system and the two prior releases. If you are running macOS 12 (Monterey) or older, contact the Computing Services Help Center for support at it-help@cmu.edu or 412-268-4357 (HELP).
Windows
- If you have existing antivirus software running on your computer, uninstall it. Note: Windows Defender does not need to be uninstalled.
- Download Falcon Sensor for Windows.
- Double-click the FalconSensorWinOS installation file.
- Allow the installer to continue.
- Accept the License agreement.
- When prompted, enter your Customer ID with Checksum.
Note: If your departmental technology support has given you a Customer ID with Checksum, enter it here. Otherwise, use the Token in your Order Details. Navigate to Your Account/Orders within the OnTheHub software portal to locate it. - Click Install.
- Click Yes and then Close.
Linux
Step 1: Verify if SecureBoot is Enabled
- Open a terminal window and enter the following command:
sudo mokutil --sb-state - Press Enter.
- If you receive the response SecureBoot Enabled, continue to Step 2: Install the Certificate for SecureBoot Signing Certificate.
- If you receive the response SecureBoot Disabled, skip to Step 3: Install CrowdStrike Falcon Sensor.
Step 2: Install the SecureBoot Signing Certificate
- The signing certificate is included in your download.
- Open a terminal window and enter the following, replacing <FULL_PATH> with the location where the certificate was downloaded. This will import CrowdStrike's certificate.
sudo mokutil --import <FULL_PATH> Press Enter.- Create a mokutil password when prompted. Note: This is separate from your Andrew password and will be used only once after your next reboot.
- Press Enter.
- Reboot your machine.
- You may be prompted to enter the Machine-Owner Key (MOK). Enter the password you created above.
- Press Enter.
- Continue to Step 3: Install CrowdStrike Falcon Sensor.
Step 3: Install CrowdStrike Falcon Sensor
- In the terminal, enter the following, replacing <FULL_PATH> with the location where you downloaded the install file.
Ubuntu:
sudo dpkg -i <FULL_PATH>RHEL, CentOS, Amazon Linux:
sudo yum install <FULL_PATH> - Press Enter.
- In the terminal, enter the following, replacing <CID> with Customer ID (CID) with Checksum.
Note: If your departmental technology support has given you a Customer ID with Checksum, enter it here. Otherwise, use the Token in your Order Details. Navigate to Your Account/Orders within the OnTheHub software portal to locate it.sudo /opt/CrowdStrike/falconctl -s --cid=<CID> - Press Enter.
- In the terminal, enter the appropriate command to start the sensor:
SysVinit:sudo service falcon-sensor start
Systemd:sudo systemctl start falcon-sensor
Verify CrowdStrike Is Running
Follow the steps for your operating system to verify that CrowdStrike is installed and running.
macOS 13 (Ventura) and Newer
- Open the Falcon application.
- You should see a window with three green checkmarks next to:
- Sensor is registered
- Sensor is operational
- Sensor is cloud connected
Windows
- The Falcon icon shows the status in the taskbar notification area (system tray):
 Falcon icon with a green check and shield - Falcon sensor is running
 Gray Falcon icon - Falcon sensor is NOT running
 X - internal sensor error
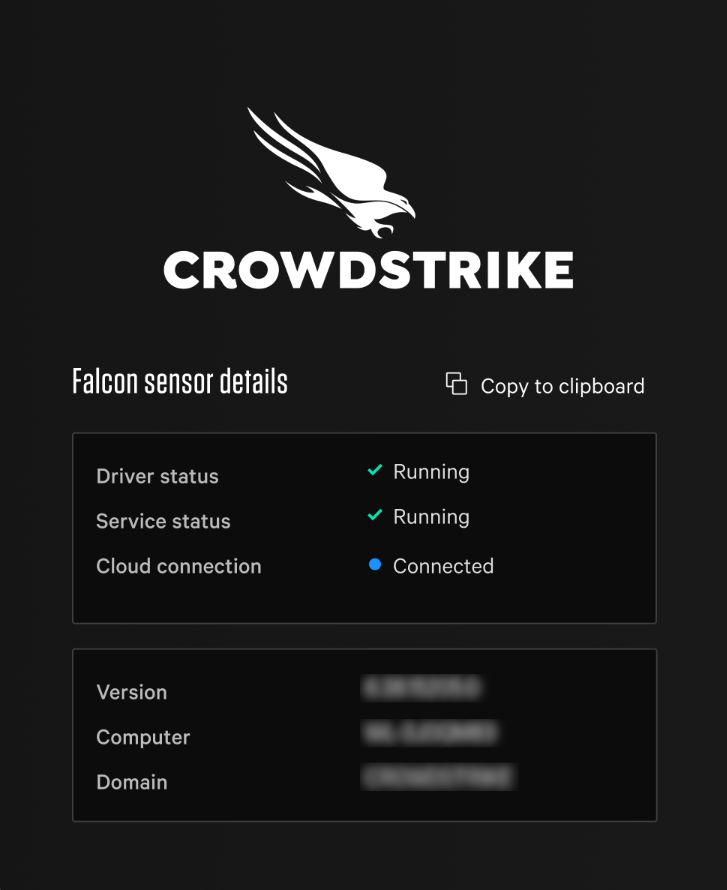
- Click the Falcon icon in the notification area to update the status and see detailed information. Driver and Server status should be checked. Cloud connection should be connected.
Linux
- In the terminal, enter the appropriate command to verify the sensor has been installed:
ps -e | grep falcon-sensor Press Enter.- If you do not see output similar to the following, contact your departmental IT administrator, DSP consultant, or the Computing Services Help Center for assistance.
[root@centos6-installtest ~]$ ps -e | grep falcon-sensor
905 ? 00:00:02 falcon-sensor
Important
The Falcon Sensor for Linux is validated for specific Linux kernel versions. If the running Linux kernel is not on the current validation list, the sensor will have reduced or no functionality. We recommend you delay installing new Linux kernels for two weeks after your distro's release date to allow time for CrowdStrike's validation process and ensure the sensor remains fully effective.