New Features in the Gradebook:
- New and rearranged sorting items
- Keyboard shortcuts
- Manage course late policies
Instructor Guide: Grading
How-to: Messaging Students through Gradebook
In the Canvas gradebook, you have the ability to send a message to students in a targeted manner. Each student will receive an individual message and will not see other students who received the same message.
How-to: Gradebook Posting Policy (new)
By default, Canvas allows students to see their grades as soon as the instructor has graded the assignment. If you wish to hide student grades until all submissions have been graded and then release grades to all students at the same time, you can update your grade posting policy on the assignment.
How-to: Attendance
The Attendance tool in Canvas provides you with an electronic way of recording students’ attendance on a given date.
How-to: Extra Credit
Towards the end of the semester, you may wish to create an extra credit column in the gradebook that you can use to award extra credit points. This how-to explores how to create an extra credit column and how to do this if you are using weighted grading in your course.
Policy: Content and Grade Retention
Students have access to Canvas courses during the enrolled semester plus three weeks into the following semester. Access will be removed unless you extend the availability date of the course.
Gradebook
How-to: Messaging Students through Gradebook
- Click on the “Message Students Who” option from the dropdown menu of the Assignment.
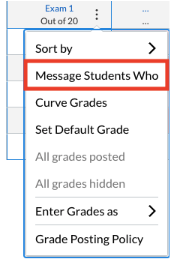
A pop-up menu will appear allowing you to message students based on the following criteria:
-
- Students who have not submitted the assignment
- Students who have not yet been graded
- Students who scored more/less than a certain threshold.

Note that not all of these options may be available to you, depending on how you have already graded (e.g. you will not see the option to message students who have not submitted an assignment if every student has submitted).
How-to: Gradebook Posting Policy (new)
- Note: This replaces the “mute” function in the old Canvas gradebook.
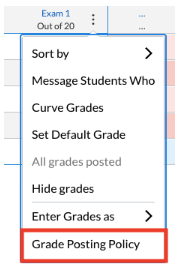
- From the Assignment Title cell in Canvas, click on the drop-down menu and select “Grade Posting Policy” from the list of options.
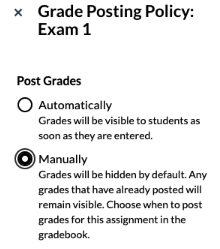
- To hide the grades from students until you are finished, select the post grades “Manually” option.
- Students will be unable to view their grades, score changes, and both in-line and overall submission comments until the assignment grades are posted. The student's grades page displays a visibility icon so students know the assignment grade is hidden.
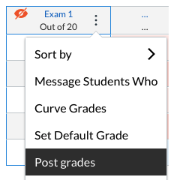
- A visibility icon will represent any assignment that is currently hidden from students.
- Once at least one submission in the assignment column has been graded, the icon will be shaded orange.
- When you are ready to post your grades, select the “Post Grades” option from the assignment drop-down menu.
- From the Assignment Title cell in Canvas, click on the drop-down menu and select “Grade Posting Policy” from the list of options.
How-to: Attendance
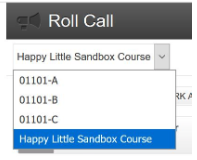
How-to: Show different sections in the Attendance tool
- From within your Canvas site, click the Attendance link in your left navigation menu
- In the Attendance tool click the drop-down menu in the upper left area to select which section you would like to view.
More Information
If you would like to see all students from all sections on one page in the Attendance tool, please contact canvas-help@andrew.cmu.edu so that we can set up your roster to do so.
Extra Credit
How-to: Extra Credit Points
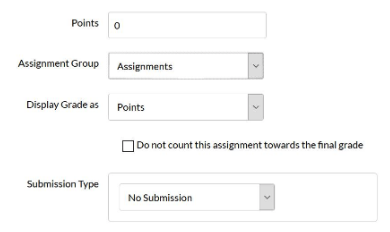
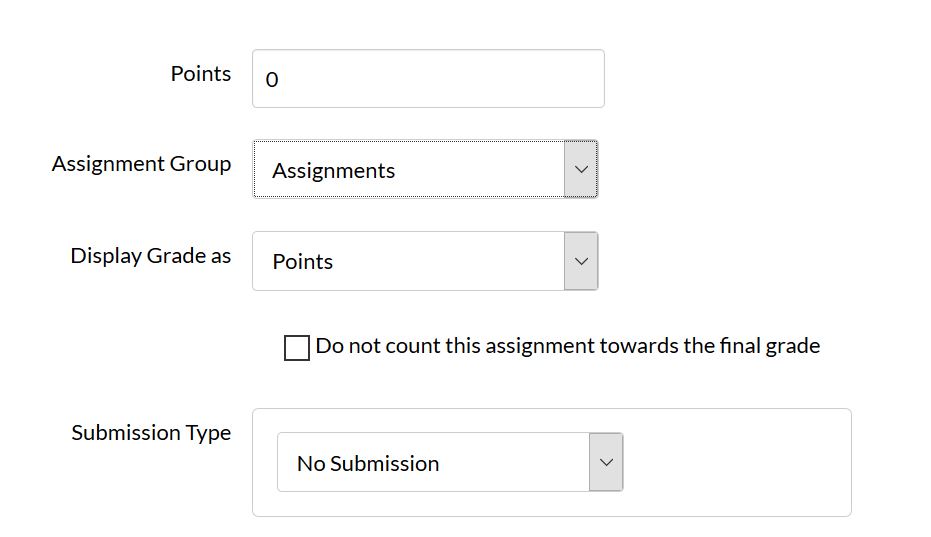
- To create an extra credit column in your gradebook, go to the Assignments area of your course and create a new assignment.
- The settings this assignment should have are: 0 points, and Submission Type: No Submission
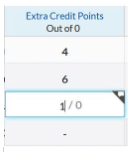
- You can then enter the extra credit points for each student in this assignment’s column in the Grades area of your course.
How-to: Extra Credit with Weighted Grading
If you are weighting assignment groups in your course to produce a weighted total grade, you would follow the steps to create an extra credit assignment and grade column. In order to ensure that the extra credit reflects appropriately in the weighted total, follow the steps below:
- Create an assignment group for the extra credit assignment (in this example, the assignment group will be called “Extra Credit”)
- Set the assignment group to be worth 0% of the total grade
- Once all assignments in the course have been graded, change the assignment group to be worth an additional % of the total grade. Typically, it is best to make this % be the max points a student could earn at extra credit. (In this example, the max extra credit points possible was 6 points, so the Extra Credit group will be worth 6% of the total grade. The new course weighted total is 106%)
Policy: Grade Retention
Policy: Content and Grade Retention
Instructors: Students have access to Canvas courses during the enrolled semester plus three weeks into the following semester. Access will be removed unless you extend the availability date of the course.
Fall - Three weeks into Spring semesterSpring - Three weeks into Summer semester
Summer - Three weeks into Fall semester
You can re-open courses to students by following the steps below.
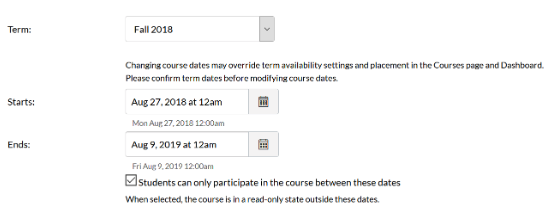
How-to
- Go to the Settings area of your course site
- Enter the desired end date in the End Date field (this will be the date students lose access to the Canvas site)
- Check the box underneath the End Date field (“Students can only participate in the course between these dates”)
- Save your changes on this page
Contact Us for Canvas and Ed Tech Support:
![]() eberly-assist@andrew.cmu.edu
eberly-assist@andrew.cmu.edu
![]() 412-268-9090
412-268-9090