Manage Users
User Enrollment in a Blackboard Course
Enrollment in a Blackboard course will typically occur automatically
based on registration, but users may also be added manually.
Automatic Enrollment for Instructors and Registered Students
Students registered in the HUB and officially enrolled in a course will
automatically be enrolled in a Blackboard course. Based on the Blackboard
course request made by the instructor, the instructor and TAs listed on
the request form will also be automatically enrolled in the Blackboard
course (given the instructor has requested a Blackboard course).
Common Problem:
Certain types of students commonly experience enrollment
problems and therefore do not have access to course materials in
Blackboard, especially during the first two weeks of the semester.
Cross-Registered Students: It can take up to two weeks
for cross-registered students to receive their Andrew IDs. While students
await their Andrew IDs, instructors may wish to
allow guest access to their Blackboard course.
Students on the Wait List: Wait-listed students do not
initially have access to the Blackboard course site. If you have important
course materials that students need to see before they become automatically
enrolled in the Blackboard course, you may want to manually enroll these
students.
Enroll a TA / User
Instructors have the ability to manually enroll users
in the course (e.g. TAs, students, guest lecturers). TAs can enroll students and
guests in a course, but cannot enroll other TAs or instructors.
Note: Users must have an Andrew account to be added to the
course. If a user does not have an Andrew account, refer to the
"User Accounts" documentation.
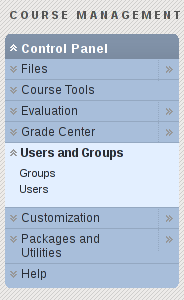
-
From the "Control Panel", expand the "Users and
Groups" menu.
-
Click "Users".
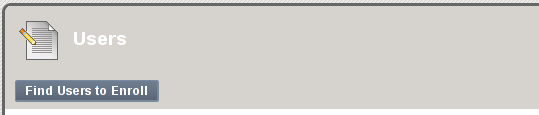
-
Click "Find Users to Enroll" (located at the top of the
"Users" page).
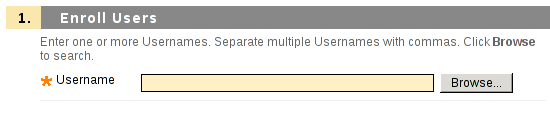
-
If the Andrew ID of the user to add to the course is known, it can be supplied
directly in the "Username" text field. If the Andrew ID of the user is
not known, search for the user:
-
Click "Browse..." to bring up a search window.
-
Select the appropriate field to search against:
-
Username: The user's Andrew ID
(the text before the @andrew.cmu.edu in
an official email address)
Note: The text before an @cmu.edu email
address is not guaranteed to be an andrew id.
-
Last Name: The user's surname
-
First Name: The user's given name
-
Email: The user's email address.
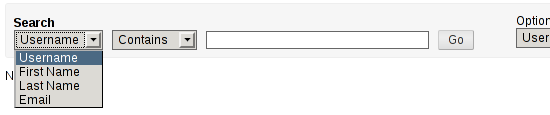
-
Select the search type "Contains" from the second dropdown menu, as
it is the most liberal. Leave it as this unless too many results are
returned to read through.
-
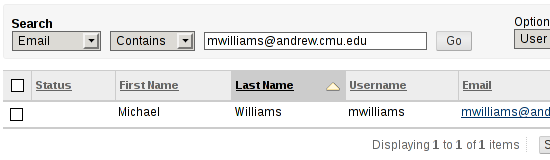
Enter the known information about the user in text box.

-
Click "Go". Blackboard will return a list of users that matches
the search parameters.
Be Aware: A user already enrolled in the course will not be
returned in these search results.
Note: When a student has become "disabled" in the
course, his/her name will not appear in either list. Contact
Blackboard Support for assistance when this occurs.
-
Select the checkbox next to each user that should be enrolled in the
course.
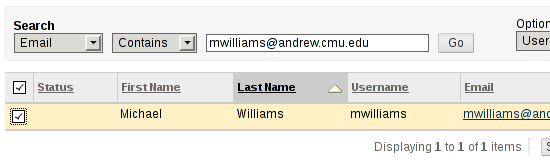
-
Click "Submit" to return to the "Enroll Users"
page with the results of the search. The username text field will
be populated with the users returned from the search.
-
From the "Enrollment Availability" dropdown menu, select a role for
the user or leave the default ("Student").
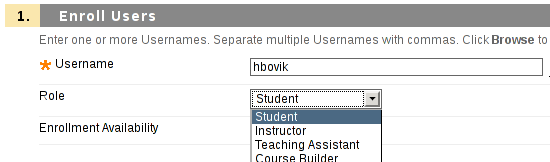
-
Click "Submit" to enroll the user.
Note: In Blackboard 9.1, the "Search" field on the
"Users" page is intended for searching students already enrolled
in the Blackboard course and does NOT search for all users listed in the
Carnegie Mellon directory. A separate "Search" field is
provided for finding users to manually enroll in the course.
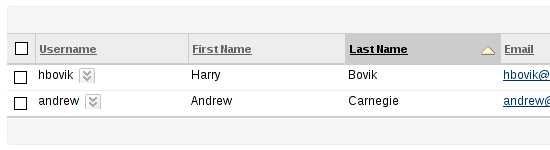
List Enrolled Users
Expand the "Users and Groups" area in the "Control
Panel" and click on "Users". A list of users enrolled in
the course will appear.
Note: If all users are not showing and you'd like to show all,
click the "Show All" button located beneath the list of users.
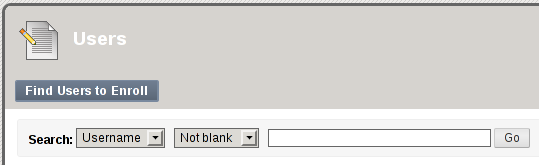
If the list of students is empty, Blackboard may have a cached filter. To
reset the filter and view all enrolled users:
-
Locate the two dropdown menus that appear under the "Find Users to
Enroll" button at the top of the "Users" page.
-
Select "Not blank" in the second dropdown menu.
-
Delete any text that appears in the text box to its right.
-
Click "Go" which appears to the far right of the text box.
This will prompt Blackboard to load the current list of enrolled users.
Search for an Enrolled User
Enter an enrolled user's Last Name, User Name, or Email address in the
Search field and click the "Go" button. The user's
information (name, username, email, role in Blackboard) will appear.
Note: This search utility will only return results for users
already enrolled in the course.
User Accounts
To receive access to Blackboard courses, individuals must have an Andrew
Account. Instructors may request a Blackboard Sponsored Account for
individuals who are not eligible for Andrew accounts.
Andrew Accounts
ALL Carnegie Mellon faculty, staff, and students are eligible for Andrew
IDs. Learn more about managing your Andrew Account from the
Computing Services'
documentation:
Blackboard Sponsored Accounts are provided by the Eberly Center at
the instructor's request. This type of account is set up to give
individuals who are NOT eligible for Andrew accounts access to a
Blackboard course. This account does not provide access to any
other Carnegie Mellon computing service.
Request a Blackboard Sponsored Account
Instructors: If you need to provide access to Blackboard for someone who
is not eligible for an Andrew account, please send us an email and include
the following information:
-
Account holder/user's information
- Account Holder's First and Last Name
- Email Address
- Address (personal permanent address or local address)
- Phone number
- Length of time the account will be needed (up to 1 year)
-
Account Sponsor's information
- Account Sponsor's Name
- Contact information
Send your Blackboard Sponsored Account request to:
bb-help@andrew.cmu.edu
General Guidelines for Sponsored Account Use
Account holders/users (owners) and their sponsors are held responsible for
the correct use of the sponsored account. Sponsored accounts are not to be
used for commercial purposes and should serve educational and university
purposes.
-
Use of the sponsored account must comply with the
internet guidelines and ethical standards
of Carnegie Mellon and comply with the intent of the sponsorship as
stated by the account sponsor.
-
All questions or changes related to the account must be referred to
the account sponsor (a senior staff or faculty person, or a
departmental account administrator).
-
Cooperation is expected from both sponsors and sponsored accounts
holders in any official resource management activities led by
Computing Services that may require cooperative participation.
-
The account must be used in a reasonably secure manner. This includes
using recommended authentication methods and
setting a secure password.
Guest Access
Guests are defined by Blackboard, Inc. as users in a course who do not
directly participate in its activities. By default, Guest Access is turned
off. Once the instructor turns on guest settings at various levels within
the course, guests will have the ability to access the course and those
areas and files within the course that the instructor has enabled.
Enroll Guests
Note: Each guest must already have an Andrew account.
Read more about sponsored accounts
Follow the process to manually enroll a
user. When able to select a role for the user, select
"Guest".
Enable Guest Access
To successfully enable guest access, three different configuration
changes must be made:
-
Turn on guest access at the course level.
-
Make course areas visible to guests.
-
Provide guest access to download files.
Warning: Instructors should not open access to guests if the
Blackboard course contains copyrighted material.
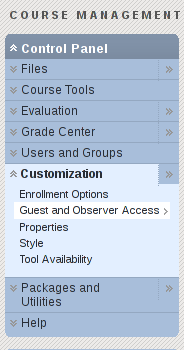
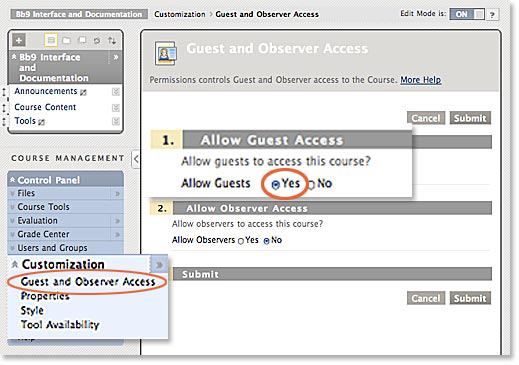
Turn on Guest Access at the Course Level
-
From the "Control Panel", expand "Customizations" and
click "Guest and Observer Access".
-
Select "Yes" under "Allow Guest Access" to allow
guest access to the course.
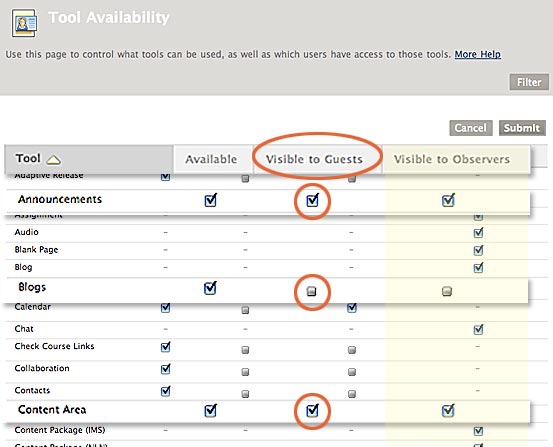
Make Course Areas Visible to Guests
-
From the "Control Panel", expand "Customizations"
and click "Tool Availability".
-
Select the checkboxes under the "Visible to Guests" column
that correspond to the tools and areas that should be available to
guests.
Provide Guest Access to Download Files
Instructors can provide guest access to all course files or to individual
files.
Guest Access to All Files
-
From the "Control Panel," expand "Files" and click
on the course title to enter the course files screen.
-
Click the double-down arrows next to the course title to expand the menu
options.
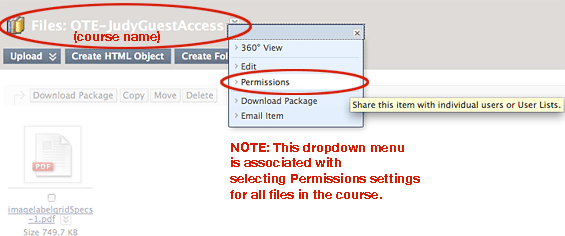
-
Select "Permissions" from the menu. A "Manage
Permissions" window will appear.
-
Add a "Guest" user type to the course files so that those
individuals with the role of "Guest" can access the course
files.
-
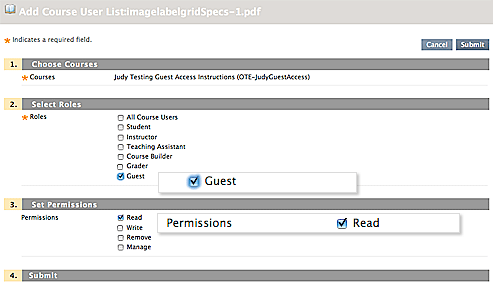
Click the "Add Course User List" button.

-
Select "Guest" located under "Select Roles" and
then select the "Permissions" to be granted guests. The
default is set to "Read" which will allow guests access to
download files. This is the recommended setting. Then click
"Submit".
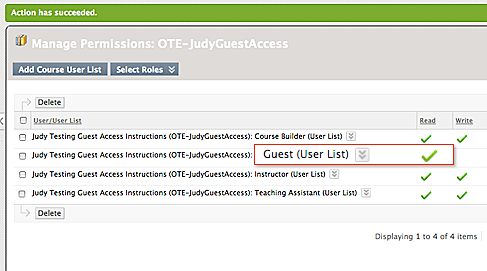
-
A confirmation message will appear at the top of the page. Note that
there is now a "Guest" user type in the listing. Click
"OK". Guest users will now have access to download and
view all course files.
Guest Access to Specific Files
-
From the "Control Panel," expand "Files" and click
on the course title to enter the course files screen.
-
Click the double-down arrows next to one of the course files to expand
the menu options.
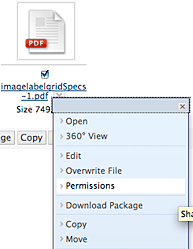
-
Select "Permissions" from the menu. A "Manage
Permissions" window will appear.
-
Add a "Guest" user type so that those individuals with the
role of "Guest" can access the file.
-
Click the "Add Course User List" button.
-
Select "Guest" located under "Select Roles" and
then select the "Permissions" to be granted guests. The
default is set to "Read" which will allow guests access to
download files. This is the recommended setting. Then click
"Submit".
-
A confirmation message will appear at the top of the page. Note
that there is now a "Guest" user type in the listing.
Click "OK". Guest users will now have access to download
and view the individual course file once you post it in a content
area that Guests can access.
User Roles & Affordances
User roles govern the amount and type of access to components of a
Blackboard Course.
Types of User Roles
A user can be assigned only one of the following roles:
-
Instructor
has master access over the Blackboard course functions.
-
Teaching Assistant
has almost the same access level that the instructor does, with the
exception that a TA CANNOT add additional instructors and TAs to a
Blackboard course. The role of TA is typically assigned to faculty
assistants, teaching assistants, or administrative assistants who
help to develop and maintain course materials, communications,
assessments, and grades in a Blackboard course.
-
Student
has access to content areas, communication and collaboration tools,
and assessments, given the instructor has made these available to
students. Students do not have access to the Control Panel. Only
those with the role of Student can take assessments and have grades
recorded in the Blackboard gradebook. Instructors can make grades
available to students and the student will see only his/her own
grades via a "My Grades" view.
Caution: If you change the role of a Student who is enrolled
in your Blackboard course to that of TA or Grader they will be removed
from the gradebook and will not be able to submit work in Blackboard.
-
Grader
is able to access all areas under Assessments in order to
manage/assign grades.
-
Course Builder
has access to most content functions. They cannot build assessments or
pools, do not have access to the gradebook, cannot create calendar
entries and course tasks, and cannot access course statistics.
-
Guest
is defined by Blackboard, Inc. as a user in a course who do not
directly participate in its activities. By default, Guest Access is
turned off at the course level. Instructors have the control to turn
this on or to allow/disallow guest access to specific areas and tools
of the course.
Read more about guest access
-
Observer is defined by Blackboard, Inc. as users in a course
who do not directly participate in its activities but who follow the
actions of one or more Students enrolled in the course. By default,
Observer Access is turned off at the course level. Instructors have
the control to turn this on or to allow/disallow observer access to
specific areas and tools of the course.
Change a User's Role in a Blackboard Course
- Navigate to the Users page.
-
Click on the dropdown arrow icon next to a user's name and select
"Change User's Role in Course" from the dropdown menu.
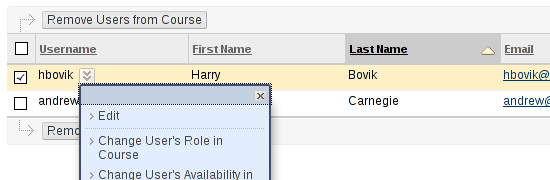
-
The available roles will appear. Click on the radio button next to the
desired role.
- Click "Submit"